Creating chromeless, non-rectangular Windows from UWP

Picture3

On my way back home from the IoT in Action event in Taipei I had a several hours time to work on a small personal spare-time app project that I am hoping to publish to the Store soon. One of my requirements involves a creating a secondary chromeless, non-rectangular utility window (that is also semi-transparent and topmost). UWP’s ApplicationView/Window doesn’t support chromeless, non-rectangular windows – but with the Windows application model being an à la carte platform, this can be accomplished by adding a desktop extension to my UWP app package that uses a WPF Window to provide the required rich windowing capabilities. My app/main window itself needs be UWP because of some other requirements.

I figured it would be useful to put together a quick sample and write-up for this, as I don’t believe we’ve ever had any docs/blogs/sample to date that describe how to create an arbitrarily shaped chromeless window from a UWP app. How arbitrary the shape can be you ask? Well, if you can draw it, it can be your window’s shape! To prove my claim my sample actually lets you hand-draw windows using the UWP InkCanvas control – check it out in the video:

In the secondary WPF windows you would typically host WPF controls to implement your UI – and now with XAML Islands (introduced in 1809) you could also host UWP controls. Note though that the XAML Island itself needs to be rectangular, if you decide to use one. In my sample app here I am just hosting a re-styled WPF button that serves as my close button. The sample app works on build 1709 and above (though the features used here are already available since build 1607). Read on for details on how to implement this scenario with just a couple of lines of code.

Tl;Dr;

Just show me the code on GitHub and let me install the sample app from the Store …

Sample Source Code
https://github.com/StefanWickDev/ExtensionGallery/tree/master/Sketch-a-Window

Sample App Installer:
https://www.microsoft.com/store/productId/9NNMBR5MH63W


Source Code Walkthrough

Project Structure

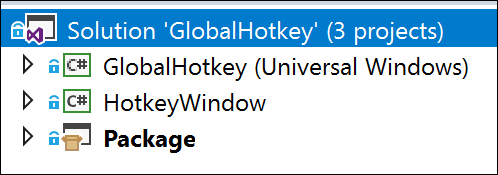
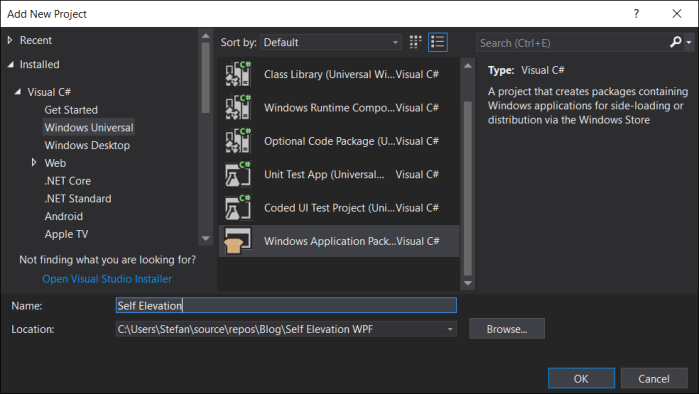
The Visual Studio solution for this sample consists of three projects:

  1. The actual UWP main app (“Sketch-a-Window”)
  2. A WPF project that provides the windowing feature (“WPF”)
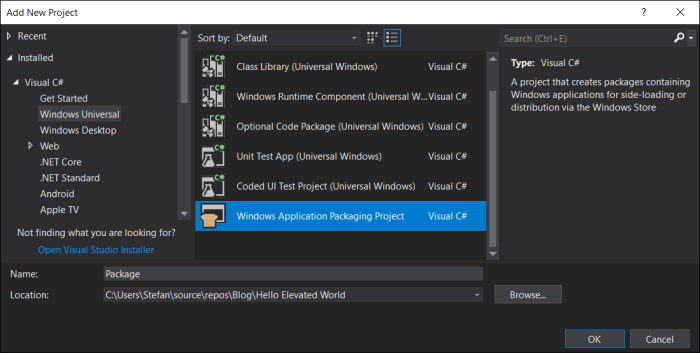
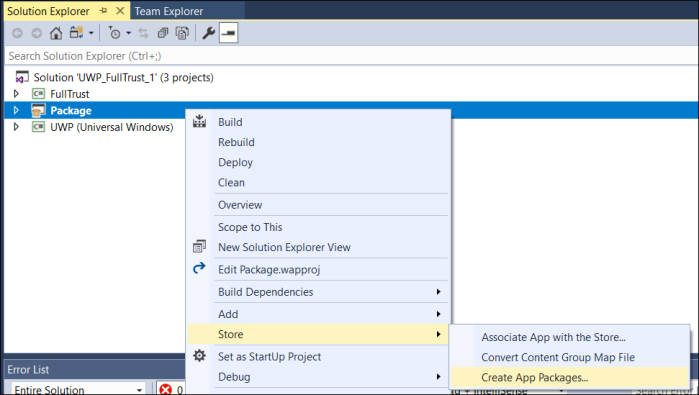
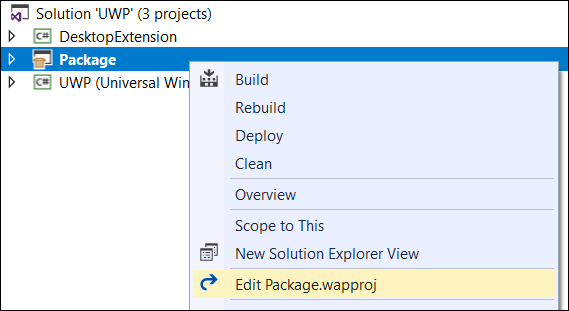
  3. A Windows App Packaging project to package the two together for distribution (“Package”)

projects

Package Manifest

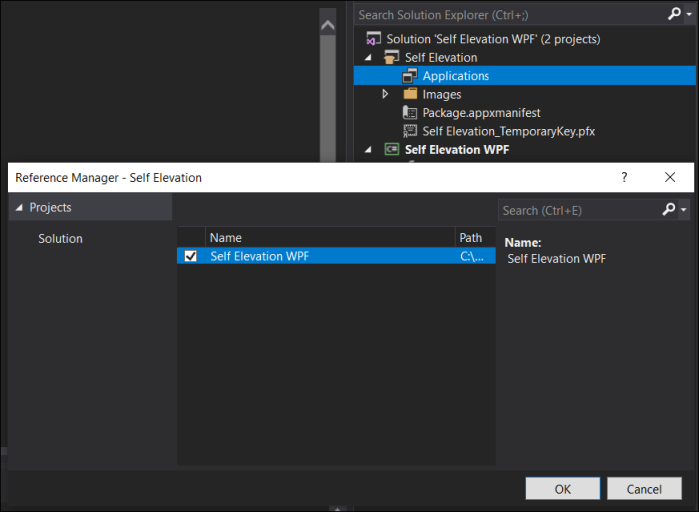
The appxmanifest file in the Package project is the one that is relevant at deployment time. Here we need to add the declaration for our desktop extension, so that the UWP app can activate the WPF process for creating the windows.

<Extensions>
  <desktop:Extension Category="windows.fullTrustProcess" Executable="WPF\WPF.exe" />
</Extensions>

UWP Code

The gist on the UWP side is that we are using the FullTrustProcessLauncher API to create the WPF window. To pass on the geometry details about the shape of the window we are using the local AppData settings. Most of the code here is specific to getting the geometry info from the collected ink stroke and passing it down to the WPF. You obviously won’t need all this code if you are creating windows of well-known shapes.

private async void InkPresenter_StrokesCollected(InkPresenter sender, InkStrokesCollectedEventArgs args)
{
    Rect viewBounds = ApplicationView.GetForCurrentView().VisibleBounds;
    Rect inkBounds = args.Strokes[0].BoundingRect;
    Rect winBounds = Window.Current.Bounds;
    ApplicationData.Current.LocalSettings.Values["X"] = viewBounds.X + inkBounds.Left;
    ApplicationData.Current.LocalSettings.Values["Y"] = viewBounds.Y + inkBounds.Top;
    ApplicationData.Current.LocalSettings.Values["Width"] = winBounds.Width;
    ApplicationData.Current.LocalSettings.Values["Height"] = winBounds.Height;
            
    var inkPoints = args.Strokes[0].GetInkPoints();
    var rawPoints = new double[inkPoints.Count * 2];
    for(int i=0; i<inkPoints.Count; i++)
    {
        rawPoints[2 * i]     = inkPoints[i].Position.X - inkBounds.Left;
        rawPoints[2 * i + 1] = inkPoints[i].Position.Y - inkBounds.Top;
    }
    SavePointsToSettings(rawPoints);            

    if (ApiInformation.IsApiContractPresent("Windows.ApplicationModel.FullTrustAppContract", 1, 0))
    {
        await FullTrustProcessLauncher.LaunchFullTrustProcessForCurrentAppAsync();
    }
    await Task.Delay(1000);
    sender.StrokeContainer.Clear();
}

WPF Code

Now on the WPF side, we are creating a window with the desired rich capabilities, specifically in this case we want to allow transparency, remove the chrome and make it topmost, which can be declared in markup like this:

<Window x:Class="WPF.MainWindow"
        ...
        WindowStyle="None" Topmost="True" AllowsTransparency="True">

In the code-behind we need to unpack the geometry information about the ink stroke and clip the window accordingly. Again, most of the code here is specific to the sample dealing with complex shapes defined by ink strokes and you won’t need it when creating windows with well-known shapes:

public MainWindow()
{
    this.Left = (double)ApplicationData.Current.LocalSettings.Values["X"];
    this.Top = (double)ApplicationData.Current.LocalSettings.Values["Y"];
    this.Width = (double)ApplicationData.Current.LocalSettings.Values["Width"];
    this.Height = (double)ApplicationData.Current.LocalSettings.Values["Height"];

    InitializeComponent();
    this.MouseMove += MainWindow_MouseMove;

    RadialGradientBrush brush = new RadialGradientBrush();
    brush.GradientStops.Add(new GradientStop(GetRandomColor(), 0.0d));
    brush.GradientStops.Add(new GradientStop(GetRandomColor(), 0.5d));
    brush.GradientStops.Add(new GradientStop(GetRandomColor(), 1.0d));
    root.Background = brush;

    double[] rawPoints = (double[])ApplicationData.Current.LocalSettings.Values["Points"];
    PathGeometry geo = new PathGeometry();
    geo.FillRule = FillRule.Nonzero;
    PathFigure figure = new PathFigure();
    figure.StartPoint = new Point(rawPoints[0], rawPoints[1]);
    PolyLineSegment segment = new PolyLineSegment();
    for (int i = 0; i < rawPoints.Length / 2; i+=2)
    {
        segment.Points.Add(new Point(rawPoints[2 * i], rawPoints[2 * i +1]));
    }
    figure.Segments.Add(segment);
    geo.Figures.Add(figure);
    this.Clip = geo;

    closeButton.SetValue(Canvas.LeftProperty, geo.Bounds.Width / 2 - geo.Bounds.Left - 16);
    closeButton.SetValue(Canvas.TopProperty, geo.Bounds.Height / 2 - geo.Bounds.Top - 16);
}


Conclusion

If you ever need to add a utility window to your UWP app that is chromeless and/or has an arbitrary shape – or using any of the other rich windowing capabilities that are still missing in UWP, using a desktop extension with a WPF window is a way to accomplish the scenario.

This was a fun sample to put together. I will now continue working on my actual personal app project that triggered the idea for this post. Will share the actual use case in an upcoming post. Follow me on twitter @StefanWickDev to get notfied. Hope you found this information helpful and maybe you can use it in one of your projects as well.

Picture3

Qt – UWP – Raspberry Pi

Capture

Ok, the title sounds like technology bingo – three apparently unrelated technologies. Here is how they fit together …

I was looking for an app framework for a simple app I wanted to write for my Raspberry Pi 3. One of my requirements for the app was that it needs to run with Raspbian (Linux) as well as with Windows IoT Core installed on my Pi. The latter exclusively runs UWP applications, but UWP apps typically can’t run on Raspbian. So what to do here?

Qt support for UWP

A little know fact about the Qt application framework is that it is compliant with the UWP app model and API specifications. And I mean UWP proper here, not Desktop Bridge for PCs. So this means you can compile and package your Qt app as a UWP app package that can then run on any Windows 10 device – PC, Xbox, HoloLens, Surface Hub and Window IoT Core!

Even if you are building only for desktop PC, this can be interesting to consider if you want to take advantage of new Windows 10 UWP APIs or modern app deployment incl. Microsoft Store distribution. Last, and certainly not least, running your Qt app as UWP will let you take advantage of the AppContainer – the unsung hero of the Windows app platform. The AppContainer ensures that the app process won’t have any undesired impact on system stability or security by keeping it in a sandbox that is defined by UWP’s capability model. In this model, for example, a calculator app only gets the capabilities it needs. It won’t be able to use the internet, read arbitrary files from the disk or mess with the system’s registry. Even if the app has a bug and the process gets hacked it won’t be able to act outside of its sandbox.

In short, Qt is a great cross-platform option worth considering when you want to get the most out of Windows 10 and need to run the same code on Windows 7, Linux, Mac, Android or iOS.

Creating a Qt UWP sample app

First step is to install Qt on our development box from https://www.qt.io/download. Then launch the Qt Creator IDE to create your first Qt application – or select one of the examples that come with the tools.

createnew

Select an application type, such as “Qt Widget Application” and give it a name. Next comes the “Kit Selection” screen:

kitselection

Let’s select one of the classic desktop kits and one of UWP kits (make sure the processor architecture works for your dev machine). Also be sure you select the UWP-ARMv7-MSVC2017 kit as we will need it for the Raspberry Pi. Then finish the project creation by accepting all the defaults. Now you can hit F5 to compile, launch and debug your project. Use the Selector control on the left pane to switch between classic desktop and UWP flavors to test your app code in both environments:

switchkit

Side-track: Distributing via Microsoft Store

The UWP Release build output is in the right format for distribution via the Microsoft Store. There are a couple of steps/best practices to follow when submitting the application the Store. I’ll save those details for a future blog post as this is not required for getting the Qt app onto the Raspberry Pi, but to make sure this is indeed working seamlessly with the Qt framework I have taken one of the examples (the Qml Oscilloscope one) and actually put it in the Store – just for testing purposes. I have set it to be not searchable in the Store, but you can get to it and install the sample via this direct link: https://www.microsoft.com/store/apps/9NVKHDDVB44D


Deploying the Qt sample app to Raspberry Pi

The Qt Creator IDE doesn’t have the capability to produce UWP distribution packages (unlike Visual Studio), so you will have to create those manually before distributing the app to your devices. Here are the steps to get your Qt app deployed and run on your Pi (or other devices running Windows IoT Core for that matter):

1. Select “UWP-ARMv7-MSVC2017” Kit and build as “Release”

Configure kit/build per below and then select Build->Rebuild All menu.

switchtoarm

2. Create the .appx package file

In a developer command prompt, go to the build output folder. It should be called something like “build-FirstQtApp-Qt_5_11_2_for_UWP_ARMv7_MSVC_2017-Release”. Then run this command to create an .appx package named “qtapp.appx” from the contents of the “release” directory

makeappx pack -p qtapp.appx -d .\release

3. Sign the .appx package

Windows 10 devices only install .appx packages that are signed with a trusted certificate. So we will need to sign our package before we can run it. If you don’t have a certificate that is trusted on your devices (e.g. from Verisign etc.) you can create a test certificate and install it on your device – for testing purposes. The tools you need to create the test certificate and sign the .appx come with the Windows 10 SDK (which comes with Visual Studio 2017). Make sure <pn> matches what is specified as publisher name in the appxmanifest.xml file. Also note that qtapp.appx is the name you selected in the previous step for your package. For the names of qt.pvk, qt.pfx, qt.cer you can select whatever you want. For full details on these steps refer to the official documentation.

MakeCert.exe -r -h 0 -n "CN=<pn>" -eku 1.3.6.1.5.5.7.3.3 -pe -sv qt.pvk qt.cer
pvk2pfx.exe -pvk qt.pvk -spc qt.cer -pfx qt.pfx
signtool.exe sign -f qt.pfx -fd SHA256 -v .\qtapp.appx

4. Use Windows Device Portal to install the app on the Pi

With the Windows Device Portal application deployment and management is very easy. To get to the portal, get the IP address of your Pi and navigate to port 8080 (in my example 192.168.1.220:8080):

wdp

In the portal now go to Apps->Apps Manager to deploy your app with these steps:

  1. If you are using a test certificate, install it on your test device using the “Install Certificate” button. Just browse to the qt.cer file you created earlier and hit “Install”
  2. Depending on your app, you might have to select dependent framework packages. Those are listed in your appxmanifest.xml file in the build output. For that check the box and then get the required packages from “%ProgramFiles(x86)%\Microsoft SDKs\Windows Kits\10\ExtensionSDKs\”
  3. Browse to the qtapp.appx file you have created in an earlier step and hit “Install”

Now your app should be installed and ready to run. You can launch and manage its lifetime from the Apps Manager here in the portal. Or you can launch it manually via the standard Windows IoT Core Shell. For my experiment I picked the Qml Oscilloscope example:

winiotcore

appslist

apprunning

Now you have your Qt app running on Windows IoT Core. The exact same app code can be compiled for and deployed to Raspbian (Linux) as well. The steps for this are well documented so I won’t go into it here. I recommend using this guide for Qt on Raspbian: https://wiki.qt.io/Raspberry_Pi_Beginners_Guide


Capture

Azure IoT with UWP

blogTitleRecently I moved to a new role within Microsoft and I am now working on the developer experience for Azure IoT. Going forward I will be shifting my blog activities to be more focused on IoT and Cloud development topics, across the diverse spectrum of technologies that is IoT today. To begin this transition I will start with a couple of introductory posts at the intersection of my previous and my current role: using the Azure IoT SDKs from UWP applications. In fact, if you are like me coming from a UWP/.NET background this is a great path to ramp up on Azure SDKs and to working with the cloud.

The Azure IoT SDKs for both the device and service side support a diverse set of programming languages and operating systems, including UWP on Windows 10. If you are using Windows IoT Core on your devices (“things”) then UWP is your choice for device app development. Also, if you are building a backend application for Windows 10 that connects to Azure IoT services, UWP can be the right tool for the task. In this first post I will focus on building a simple device application.

Building a Rating “Thing”

Simple goal for this first post: Using my Raspberry Pi 3, loaded with Windows IoT Core 17763 (aka 1809 update) I want to build a “thing” that lets customers rate their experience and sends that data to the cloud. You may have seen screens like this in airport bathrooms:

ratingux

What do I need?

  • Visual Studio 2017 with the latest updates
  • Azure subscription (free trial subscription will be sufficient for this example)
  • Raspberry Pi 3 (or any other device running Windows IoT Core)

If you don’t have an IoT device yet, you can still play along and use your PC as (simulated) IoT device. This is where the “universal” part of UWP comes in very handy because you will be able to run the same UWP app on both your PC and the device.

Preparation Steps

Azure Portal

Log into the Azure Portal and create an IoT Hub resource (choose the “Free Tier”)

iothub

Once the resource has been created, go to it and select “IoT Devices” from the left pane and click “Add”

adddevices

Now pick a name for your device and click “Save”

createDevice

Last step is to select the newly created device in the list and copy its connection string from the device details. Store this in notepad or somewhere so can get to it in a later step easily.

connstring

If you want to test with more than one device, please repeat the above steps for each device. I’d recommend you create at least two devices: one for your Raspberry Pi and one for your PC, so can test from both and observe the data flowing into Azure from more than one device.

Device

If you are using your PC as (simulated) device then there is nothing else to do here. For your Raspberry Pi follow the official steps from docs.microsoft.com to set up the latest Windows IoT Core build (at the time of this writing it was build 17763). Setup, configuration and maintenance of your Windows IoT Core device is a breeze using the Windows 10 IoT Dashboard and the Windows Device Portal.

Visual Studio 2017

Just make sure you have the latest updates and the Universal Windows Platform workload selected as part of your setup:

uwp

Now there are three options for you to get the device app running and connected to Azure:

1. Install the app from the Store and start running it from your PC (as simulated IoT  device)

You can find the pre-built sample app in the Microsoft Store at the below link. Install and launch it from there: https://www.microsoft.com/store/apps/9NGS2T2X166N

enterstring

The device app needs to know what the respective device’s connection string so can successfully connect to the Azure IoT Hub. So copy the string you had saved in the earlier step and paste it here. Click OK and once the connection is established the controls will be enabled and you can start submitting your ratings.

For an initial quick verification that the messages are arriving in your IoT Hub, navigate to the Azure Portal a go to your IoTHub resource. In the overview section, click on the “Device to cloud messages” chart and verify that your messages are arriving as expected. This view of Azure Monitor data may take a minute or two to get updated:

azmonitor


2. Download the source from GitHub, build and run it on your PC (as simulated IoT device)

To learn about the code, step through it in the debugger, make modifications etc. you can get the VS solution from here:

https://github.com/wickste/RatingThing

Open the RatingThing.sln solution in Visual Studio make sure you select x86 or x64 as target architecture and hit F5 to run with the debugger. Again you will need to enter your device’s connection string.


3. Deploy the app to your Raspberry Pi and connect it to Azure

Now the interesting way to run it of course is on your actual device (e.g. Raspberry Pi). For that you want to put the respective device connection string in the code (at the top of MainPage.xaml.cs. Note that in a production scenario you would not be doing it this way. Instead you would be using the Azure IoT Hub Device Provisioning Service that enables secure device provisioning at scale.

Next we set up VS for remote deployment and debugging for your Raspberry Pi. Select “ARM” as your architecture and “Remote Machine” as your target – then go into the Debug settings of your project properties to select the specific device you want to deploy to:

remotedebug

Now you can hit F5 to deploy and debug, just like you normally do for your desktop applications (just note that everything will be a bit slower …). So here we have it – our UWP app running on the Pi, connected to our Azure IoT Hub service:


Step-by-Step Code Review (full source here)

We start with the empty UWP app template and add a Nuget package for the Azure IoT Device Client SDK:

nuget

The XAML for our UI is extremely simply, thanks to the built-in RatingControl. Just stack the RatingControl on top of a TextBlock and a Button, and then wrap it all in a Viewbox for proper sizing on different display sizes:

<Viewbox Margin="24">
    <StackPanel>
        <RatingControl x:Name="ratingControl" IsEnabled="False"/>
        <TextBlock Text="Rate Your Experience"/>
        <Button x:Name="btnSubmit" Margin="12" IsEnabled="False"
                Content="Submit" Click="btnSubmit_Click"
                HorizontalAlignment="Center"/>
    </StackPanel>
</Viewbox>

Now we need to write the code to connect to our Azure IoT Hub, assuming we have obtained our device connection string (either from the dialog, or hard-coded in the source). Once our connection request has been processed we update the UI controls according to the connection status:

private void ConnectToAzure()
{
         
  iotHubClient = DeviceClient.CreateFromConnectionString(connectionString,
                                                         TransportType.Mqtt);
  iotHubClient.SetConnectionStatusChangesHandler(
    new ConnectionStatusChangesHandler(this.StatusChangesHandler));
  iotHubClient.OpenAsync();
}

private async void StatusChangesHandler(ConnectionStatus status,
                                        ConnectionStatusChangeReason reason)
{
  await this.Dispatcher.RunAsync(CoreDispatcherPriority.Normal, () =>
  {  
    if (status == ConnectionStatus.Connected)
    {
      ratingControl.IsEnabled = true;
      btnSubmit.IsEnabled = true;
    }
    else
    {
      ratingControl.IsEnabled = false;
      btnSubmit.IsEnabled = false;
    }
  });
}

Last step to do is send the data whenever a customer provides their rating. In addition to the rating value, we also want to pass along some system health data to our backend. In this simple example I am adding the current memory usage to the telemetry message so we can build insights on the backend about our app’s health over time (subject of a future post):

private async void btnSubmit_Click(object sender, RoutedEventArgs e)
{
  ulong kiloBytes = MemoryManager.AppMemoryUsage / 1024;
  int rating = (int)ratingControl.Value;

  Message message = new Message();
  message.Properties.Add("rating", rating.ToString());
  message.Properties.Add("app-memory-usage", kiloBytes.ToString());

  await iotHubClient.SendEventAsync(message);
  ratingControl.ClearValue(RatingControl.ValueProperty);
}

That’s it. Pretty easy to get to this point thanks to Visual Studio, .NET & C# and the Universal Windows Platform. In the upcoming posts I will extend the solution on the cloud side and show several options for processing the data from our Rating Thing in Azure and taking action on the insights gained from our devices.

ablogTitle

App Elevation Samples – Part 3

Picture5

If you haven’t read part 1 and part 2 of this series yet, please start there first. I have covered the “hello world” version of a packaged app that requires elevation at launch time and showed how a packaged app can dynamically elevate itself. In this post we’ll get to the fun part: using the ‘allowElevation’ capability from a UWP app to execute code with elevated privileges on Windows 10 desktop with the 1809 update.

TL;DR

I already have the 1809 update and the Windows SDK 17763 (or later) installed. Just show me the code on GitHub …

Sample Code Repo on Github

Step-by-Step Tutorial

1. Create a new Universal Windows App

Make sure you run Windows 10 with the 1809 update and have the Windows SDK 17763 (or later) installed. Now create a new C# Universal Windows application in Visual Studio 2017 (can use any supported programming language as well, e.g. C++, JS, …):

FileNewProject2

Be sure to set both “Minimum” and “Target” version to 17763 or higher as build number 17763 maps to the 1809 update for Windows 10. The ‘allowElevation’ capability we will be using has been introduced in 1809 and is not available in earlier versions of Windows 10.

setVersions

Now we need to add a ‘fullTrustProcess’ desktop extension to our UWP that will contain the code we want to run with elevated privileges. For a complete tutorial on UWP desktop extension read up here on all the details. In this post I will quickly move through the steps of setting up the desktop extension for our new UWP app:

2. Add the desktop extension project

For this example we want the desktop extension process to be headless (i.e. a background process without UI). It can have a UI as well if that’s what you need for your scenario. So let’s add a C# desktop console application (of course this could be C++, VB, etc. as well) and call it “Elevated Extension”:

addConsole2
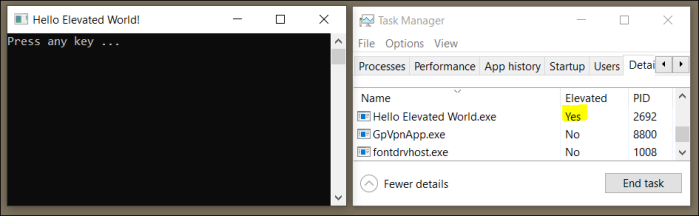
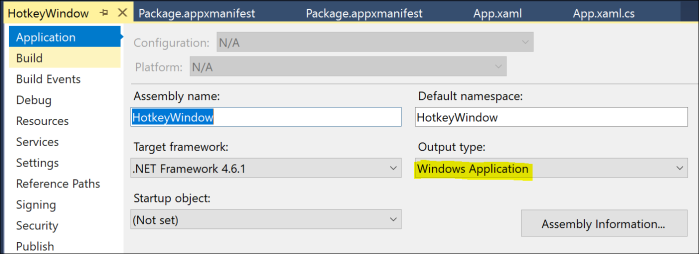
We don’t want a console box to pop up for our elevated background process, so we need to configure this project to run headless. For that go into the project settings and change the Output Type from “Console Application” to “Windows Application” (I know, not very intuitive …)

outputType

5. Packaging everything together

Next we need to add a “Windows Application Packaging Project” (look for it in the “Windows Universal” category). Name it “Package” and make it the startup project,  so your solution setup looks like in the screenshot below. In order to package both the UWP and the desktop code in one app package, add both as Application references to the Packaging project:

addref3

6. Configuring the appx manifest

Now to connect the two projects we need to declare the “fullTrustProcess” desktop extension in the package manifest. For this open the Package.appxmanifest file in the Packaging project (“Package”) in XML editing mode and add the extension within the <Application> node. While we are in this file we are also adding the “appExecutionAlias” extension that we learned about in part 2, as we will need it to launch our extension with elevated privileges. Last but not least, you will also need to add namespace definitions for “uap3” and “desktop” in the root <Package> element per below snippet.

<Package
  ...
  xmlns:uap3="http://schemas.microsoft.com/appx/manifest/uap/windows10/3"
  xmlns:desktop="http://schemas.microsoft.com/appx/manifest/desktop/windows10"
  IgnorableNamespaces="uap3 desktop ...">
  ...

  <Extensions>

    <desktop:Extension Category="windows.fullTrustProcess"
                       Executable="Elevated Extension\Elevated Extension.exe">
      <desktop:FullTrustProcess>
        <desktop:ParameterGroup GroupId="User" Parameters="/user" />
        <desktop:ParameterGroup GroupId="Admin" Parameters="/admin" />
      </desktop:FullTrustProcess>
    </desktop:Extension>

    <uap3:Extension Category="windows.appExecutionAlias"
                    Executable="Elevated Extension\Elevated Extension.exe"
                    EntryPoint="Windows.FullTrustApplication">
      <uap3:AppExecutionAlias>
        <desktop:ExecutionAlias Alias="ElevatedExtension.exe" />
      </uap3:AppExecutionAlias>
    </uap3:Extension>

  </Extensions> 
  ...
</Package>

Note that the the two parameter groups I am defining for the desktop extension are not mandatory. I am doing it here only for this sample to later demonstrate how we can launch the extension with either user privileges or admin privileges.

7. Adding the launcher code

Now that solution and manifest are set up and configured correctly, we are ready to add the code to launch the extension from the UWP – as either elevated or regular process. First lets add some XAML to MainPage.xaml:

<StackPanel HorizontalAlignment="Center" VerticalAlignment="Center">
    <Button Content="Run Backgroundprocess as User"
            Click="ButtonUser_Click"
            HorizontalAlignment="Stretch"
            FontSize="32" Margin="3"/>
    <Button Content="Run Backgroundprocess as Admin"
            Click="ButtonAdmin_Click"
            HorizontalAlignment="Stretch"
            FontSize="32" Margin="3"/>
</StackPanel>

Before we can add the code-behind for the button click handlers, we need to add a reference to the UWP desktop extension SDK, because that’s where the FullTrustProcessLauncher API is defined. This API, btw, is not new in the 1809 update. It has been around since the Creators Update (SDK build 14393), but it’s recommended you reference the Desktop extension SDK that matches your target version, i.e. 17763 in our case.

addDeskExte

Next we add the two button click handlers in MainPage.xaml.cs. The key piece is the FullTrustProcessLauncher API. We are passing in the parametergroup to indicate to the extension whether we need to run it as user or with admin privileges. The processing of this parameter is application logic as we will see in the next step. Wrapping this call into an “IsApiContractPresent” is an important practice to ensure our universal app can run without crashing also on non-desktop devices that don’t support the FullTrustProcessLauncher API:

private async void ButtonUser_Click(object sender, RoutedEventArgs e)
{
  if (ApiInformation.IsApiContractPresent(
      "Windows.ApplicationModel.FullTrustAppContract", 1, 0))
  {
    await
      FullTrustProcessLauncher.LaunchFullTrustProcessForCurrentAppAsync("User");
  }
}

private async void ButtonAdmin_Click(object sender, RoutedEventArgs e)
{
  if (ApiInformation.IsApiContractPresent(
      "Windows.ApplicationModel.FullTrustAppContract", 1, 0))
  {
    await
      FullTrustProcessLauncher.LaunchFullTrustProcessForCurrentAppAsync("Admin");
  }
}

The final piece of code we need to add now goes into Program.cs of the “Elevated Extension” project. This is the code that handles the “/user” vs “/admin” parameter. If the latter has been specified we want to do the same as in part 2, i.e. relaunch the process as admin using the AppExecutionAlias. In case you are wondering why the strings we are handling here are different from the strings being passed to the launch API (“/user vs “User”), take a look at the ParameterGroup entries we added to the manifest. It maps a friendly name (“User”) to what could be in some case a fairly convoluted long string of parameters (“/user” in our case).

static void Main(string[] args)
{
    if (args.Length > 2)
    {
        if (args[2] == "/admin")
        {
          string aliasPath =
      Environment.GetFolderPath(Environment.SpecialFolder.LocalApplicationData) +
      @"\microsoft\windowsapps\ElevatedExtension.exe";

          ProcessStartInfo info = new ProcessStartInfo();
          info.Verb = "runas";
          info.UseShellExecute = true;
          info.FileName = aliasPath ;
          Process.Start(info);
          return;
        }
    }

    AutoResetEvent areWeDone = new AutoResetEvent(false);
    // do some task, then exit
    areWeDone.WaitOne(10000); 
}

8. Run and test the solution

Now we are ready to run and test our solution, before hitting F5 make sure the “Package” project is set as startup project and you have added the “allowElevation” capability in its appx manifest:

  <Capabilities>
    <Capability Name="internetClient" />
    <rescap:Capability Name="runFullTrust" />
    <rescap:Capability Name="allowElevation" />
  </Capabilities>

When the UWP is up-and-running use the buttons to launch the extension either as user or as admin. Observe the result in TaskManager, remember that the extension has been coded to exit itself after 10sec in this example:

uwpElevated

This concludes my 3-part tutorial about the new ‘allowElevation’ capability. Please leave your feedback and questions as comments and I will do my best to address them in a timely fashion.

Picture0

App Elevation Samples – Part 2

Picture4

If you haven’t read part 1 of this series yet, please start there first. I have covered the “hello world” version of a packaged app that requires elevation at launch time. In this post I want to show how a packaged app can dynamically elevate itself after it has been launched normally.

TL;DR

I already have the 1809 update and the Windows SDK 17763 (or later) installed. Just show me the code on GitHub …
Sample Code Repo on Github

Step-by-Step Tutorial

1. Create a new desktop application

Make sure you run Windows 10 with the 1809 update and have the Windows SDK 17763 (or later) installed. Now create a new C# WPF desktop application in Visual Studio 2017 (can be any type of desktop application really):

FileNewProject

2. Convert to a packaged app

Add a Windows Packaging Project to the solution and call it “Self Elevation”:

addPackage2

Be sure to set both “Minimum” and “Target” version to 17763 or higher as build number 17763 maps to the 1809 update for Windows 10:

setVersions

Reference your WPF application from the packaging project by right-clicking on the “Application” node under the “Package” project and selecting “Add Reference …” :

addRef2

Now set the “Self Elevation” package project as your startup project in the solutions settings per below screenshot, and then hit F5 to see your empty packaged WPF app running.

setStartup2

3. Add code to elevate dynamically

In contrast to the previous example, we are not adding an application manifest to require elevation. We want the application to run at normal user privileges by default, and only request elevation dynamically when it is indeed needed.

To demonstrate this, let’s add a button to the XAML user interface in MainPage.xaml:

<Grid>
    <Button Content="Elevate Me!"                
            HorizontalAlignment="Center"
            VerticalAlignment="Center"
            FontSize="48"
            Click="Button_Click"/>
</Grid>

And add the following code-behind in MainPage.xaml.cs, to re-launch the app with elevated privileges:

private void Button_Click(object sender, RoutedEventArgs e)
{
  string aliasPath =
    Environment.GetFolderPath(Environment.SpecialFolder.LocalApplicationData) +
    @"\microsoft\windowsapps\SelfElevationWPF.exe";

  ProcessStartInfo info = new ProcessStartInfo();
  info.Verb = "runas";
  info.UseShellExecute = true;
  info.FileName = aliasPath;
  Process.Start(info);

  App.Current.Shutdown();
}

To re-launch as admin we need to call Process.Start (or CreateProcess), but packaged apps can’t just be launched via these APIs. Luckily, packaged apps have the concept of AppExecutionAlias, which is a 0-byte EXE that facilitates the packaged app launch for classic invokers – such as CMD or Process.Start.

The first line is about getting the full path to this 0-byte AppExecutionAlias EXE file for our WPF app. Then we are creating the parameters for the Process.Start call. Key piece here is the “runas” verb, that will trigger the request for elevation for the relaunched app.

Finally, once we have relaunched ourselves as elevated, we can shutdown our current instance.

4. Declare the AppExecutionAlias

Packaged apps don’t have an AppExecutionAlias by default – the developer needs to be explicit about supporting this additional launch contract in the appx manifest. So let’s add this extension to our Package.appxmanifest file inside the <Application> node.

<Package
  ...
  xmlns:uap3="http://schemas.microsoft.com/appx/manifest/uap/windows10/3"
  xmlns:desktop="http://schemas.microsoft.com/appx/manifest/desktop/windows10"
  IgnorableNamespaces="uap3 desktop ...">
  ...

  <Extensions>
    <uap3:Extension Category="windows.appExecutionAlias"
                    Executable="Self Elevation WPF\Self Elevation WPF.exe"
                    EntryPoint="Windows.FullTrustApplication">
      <uap3:AppExecutionAlias>
        <desktop:ExecutionAlias Alias="SelfElevationWPF.exe" />
      </uap3:AppExecutionAlias>
    </uap3:Extension>
  </Extensions> 
  ...
</Package>

Now we are almost done – last thing to add to our appx manifest is the same “AllowElevation” capability that we have already used in the previous post:

  <Capabilities>
    <Capability Name="internetClient" />
    <rescap:Capability Name="runFullTrust" />
    <rescap:Capability Name="allowElevation" />
  </Capabilities>

That’s it. Now we can test via F5 or by deploying the app package on our test machine. Use TaskManager to observe how the “Elevation” status changes from ‘false’ to ‘true’ after clicking the button and accepting the elevation request.

taskman

In the next post in this series I will cover how to trigger elevated code execution from a pure UWP process running in the app container by combining the concepts of the “fullTrustProcess” desktop extension, the “allowElevation” capability and the “appExecutionAlias” extension.

Part 3 – UWP with elevated extension

App Elevation Samples – Part 1

Picture0

Elevate your packaged apps with the new ‘allowElevation’ capability. With the 1809 update for Windows 10, apps can now declare this new capability in order to require elevation – or elevate themselves dynamically when needed. I will explain the new capability with three samples in this mini-series of posts:

1 – “Hello Elevated World” – simple packaged elevated desktop app (this post)
2 – Desktop app self-elevates dynamically when needed
3 – Elevated extension to a UWP application

As with all restricted capabilities, be sure to read the official Microsoft documentation regarding current policies for distribution via the Microsoft Store:
https://docs.microsoft.com/en-us/windows/uwp/packaging/app-capability-declarations#restricted-capabilities

Outside of the Microsoft Store you can of course distribute your apps with any restricted capabilities.

Hello Elevated World

TL;DR

I already have the 1809 update and the Windows SDK 17763 (or later) installed. Just show me the code  …
Sample Code Repo on Github

Step-by-Step Tutorial

1. Create a new desktop application

Make sure you run Windows 10 with the 1809 update and have the Windows SDK 17763 (or later) installed. Now create a new C# desktop console application in Visual Studio 2017 (can be any type of desktop application really):
createApp

2. Add a few lines for testing

static void Main(string[] args)
{
    Console.Title = "Hello Elevated World!";
    Console.WriteLine("Press any key ...");
    Console.ReadKey();
}

3. Add app manifest and require elevation

Project | Add New Item … | Application Manifest File
addManifest
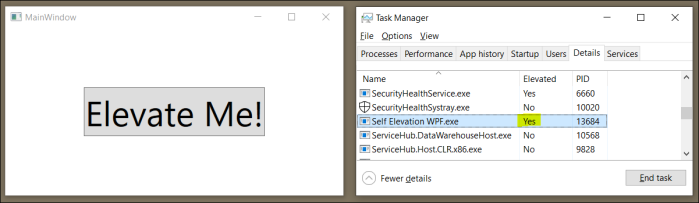
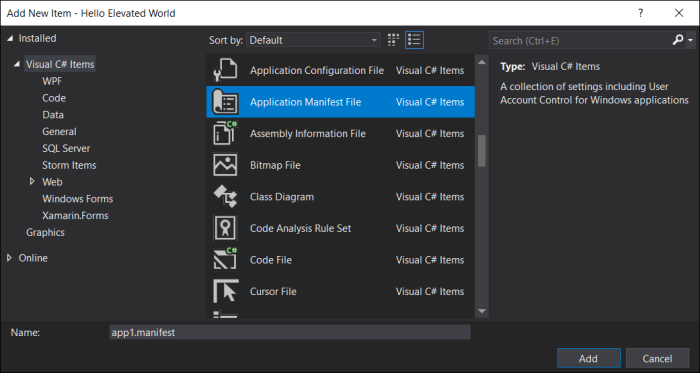
Open the app.manifest file and change the requested execution level from “asInvoker” to “highestAvailable”:

<requestedExecutionLevel level="highestAvailable" uiAccess="false" />

Now verify that running the unpackaged app will run as elevated after popping up the UAC prompt (unless you have turned this off).

4. Convert to a packaged app

Add a Windows Packaging Project to the solution and call it “Package”:addPackage

Be sure to set both “Minimum” and “Target” version to 17763 or higher as build number 17763 maps to the 1809 update for Windows 10:

setVersions

Reference your desktop console application from the packaging project by right-clicking on the “Application” node under the “Package” project and selecting “Add Reference …” :addRef

Now set the “Package” project as your startup project in the solutions settings:setStartup

5. Final Step: add the ‘allowElevation’ capability declaration

If you now hit F5 to run your packaged console app you will see the expected error stating that the launch failed because it requires elevation. This is the correct default behavior for packaged applications.

error

With the new ‘allowElevation’ capability apps can now properly disclose that they will/may request to run with elevated privileges. So let’s add this capability in Package.appxmanifest:

  <Capabilities>
    <Capability Name="internetClient" />
    <rescap:Capability Name="runFullTrust" />
    <rescap:Capability Name="allowElevation" />
  </Capabilities>

Hit F5 again and you will see your packaged app requesting elevated privileges and then run as elevated process:elevated

And we are done! You have now implemented your first packaged app that runs with elevated privileges. To create the actual distribution package for your application you would follow the usual steps: Select the “Package” project in solution explorer, then go to Project | Store | Create App Packages …

In the next post I will cover how a packaged app can self-elevate itself dynamically, for example to access a file that requires administrative privileges.

AllowElevation Samples Part 2 – Dynamic Self Elevation


Global hotkey registration in UWP

screenshot_octo

As promised, I am starting now to share a number of concrete scenario samples where UWP apps can light up common desktop features using desktop extensions. In this post my UWP app will register for system-wide hotkeys and handle them – even when the app is suspended.

TL;DR;

architecture

Just show me the code on github …
https://github.com/StefanWickDev/ExtensionGallery/tree/master/GlobalHotkey

Let me run the demo app from the Microsoft Store …
https://www.microsoft.com/store/apps/9NJW3LBC2Z3Q


Implementation

If you have followed my tutorial for desktop extensions you will find this one pretty straight forward, here are the detailed steps to implement this feature from scratch:

1. Project Setup

We are using the same project setup as explained in part 1 of the tutorial, with a UWP project, a C# console project and a Packaging project to tie it all together:

solution

Since we don’t want the console project to actually pop up a console window (or any window for that matter), we need to switch the output type from Console to Windows Application (I know, not very intuitive …):

outputtype

2. Declaring & Launching the Desktop Extension

Now we can declare the Desktop Extension in the Package.appxmanifest file. Be sure to declare this in the Packaging project, not the UWP project! While we are at it, let’s also declare the AppService. We will need it later to communicate the WM_HOTKEY event back to the UWP process.

<Extensions>
 <desktop:Extension Category="windows.fullTrustProcess"
 Executable="HotkeyWindow\HotkeyWindow.exe" />
 <uap:Extension Category="windows.appService">
 <uap:AppService Name="HotkeyConnection" />
 </uap:Extension>
</Extensions>

Now with this in place, we can launch the Desktop Extension from our UWP app. Before we launch it, we will store our ProcessId in the local settings, so the extension can pick it up and track the lifetime of the UWP. This will help us to clean up and shutdown when the UWP process goes away.

// MainPage.xaml.cs
if (ApiInformation.IsApiContractPresent("Windows.ApplicationModel.FullTrustAppContract", 1, 0))
{
 Process process = Process.GetCurrentProcess();
 ApplicationData.Current.LocalSettings.Values["processID"] = process.Id;

 await FullTrustProcessLauncher.LaunchFullTrustProcessForCurrentAppAsync();
}

When the extension launches, it will get to work right away and register the hot keys for our application. Before it can do so though, it needs to create a (headless) window in order to handle the incoming WM_HOTKEY messages, whenever the hot keys get pressed:

// HotkeyWindow.cs
public HotkeyAppContext()
{
 int processId = (int)ApplicationData.Current.LocalSettings.Values["processId"];
 process = Process.GetProcessById(processId);
 process.EnableRaisingEvents = true;
 process.Exited += HotkeyAppContext_Exited;
 hotkeyWindow = new HotKeyWindow();
 hotkeyWindow.HotkeyPressed += new HotKeyWindow.HotkeyDelegate(hotkeys_HotkeyPressed);
 hotkeyWindow.RegisterCombo(1001, Modifiers.Alt, Keys.S); // Alt-S = stingray
 hotkeyWindow.RegisterCombo(1002, Modifiers.Alt, Keys.O); // Alt-O = octopus
}


3. Communicating the WM_HOTKEY event

Once we get a HotkeyPressed event (i.e. when we process WM_HOTKEY in our headless window), we create an AppServiceConnection back to the UWP process and send the ID of the hotkey:

// HotkeyWindow.cs
private async void hotkeys_HotkeyPressed(int ID)
{
 // send the key ID to the UWP
 ValueSet hotkeyPressed = new ValueSet();
 hotkeyPressed.Add("ID", ID);

 AppServiceConnection connection = new AppServiceConnection();
 connection.PackageFamilyName = Package.Current.Id.FamilyName;
 connection.AppServiceName = "HotkeyConnection";
 AppServiceConnectionStatus status = await connection.OpenAsync();
 connection.ServiceClosed += Connection_ServiceClosed;
 AppServiceResponse response = await connection.SendMessageAsync(hotkeyPressed);
}

Now on the UWP side we handle this request and kick-off off the respective animal animation:

// MainPage.xaml.cs
private async void AppServiceConnection_RequestReceived(
                     AppServiceConnection sender,
                     AppServiceRequestReceivedEventArgs args)
{
 AppServiceDeferral messageDeferral = args.GetDeferral();
 int id = (int)args.Request.Message["ID"];
 switch(id)
 {
  case 1001://stingray
   await this.Dispatcher.RunAsync(CoreDispatcherPriority.Normal, () =>
   {
    stingrayMove.Begin();
   });
   break;
   ...


4. NativeWindow Implementation

The underlying Win32 magic is implemented in the HotkeyWindow class, derived from NativeWindow:

// HotkeyWindow.cs
public class HotKeyWindow : NativeWindow
{
 private const int WM_HOTKEY = 0x0312;
 private const int WM_DESTROY = 0x0002;

 [DllImport("user32.dll")]
 public static extern bool RegisterHotKey(IntPtr hWnd, int id, int fsModifiers, int vlc);
 [DllImport("user32.dll")]
 public static extern bool UnregisterHotKey(IntPtr hWnd, int id);

 private List<Int32> IDs = new List<int>();
 public delegate void HotkeyDelegate(int ID);
 public event HotkeyDelegate HotkeyPressed;

 // creates a headless Window to register for and handle WM_HOTKEY
 public HotKeyWindow()
 {
  this.CreateHandle(new CreateParams());
  Application.ApplicationExit += new EventHandler(Application_ApplicationExit);
 }

 public void RegisterCombo(Int32 ID, Modifiers fsModifiers, Keys vlc)
 {
  if (RegisterHotKey(this.Handle, ID, (int)fsModifiers, (int)vlc))
  {
   IDs.Add(ID);
  }
 }

 private void Application_ApplicationExit(object sender, EventArgs e)
 {
  this.DestroyHandle();
 }

 protected override void WndProc(ref Message m)
 {
  switch (m.Msg)
  {
   case WM_HOTKEY: //raise the HotkeyPressed event
    HotkeyPressed?.Invoke(m.WParam.ToInt32());
    break;

   case WM_DESTROY: //unregister all hot keys
    foreach (int ID in IDs)
    {
     UnregisterHotKey(this.Handle, ID);
    }
    break;
   }
   base.WndProc(ref m);
  }
 }

5. Lifetime Considerations

There are a couple of interesting app lifetime/lifecycle considerations and options in this sample that I want to touch on:

a. Bringing the UWP back to the foreground

When the hotkey is processed in the sample, the UWP is brought to the foreground, so you can enjoy the animation. This is optional and for other scenarios you may chose to leave it in the background. At any rate, we accomplish this by calling AppListEntry.LaunchAsync() on ourselves. This API when called on a running app has the desired effect to bring the app into the foreground, even when the UWP process was suspended.

b. Lifecycle of the Desktop Extension

In this sample the extension’s lifecycle is coupled with the UWP app’s lifecycle. This makes sense here since we want the hotkeys to only be registered while the UWP is running (or suspended), not beyond that. That’s why we are tracking the UWP process and will unregister the hotkeys and shutdown the extension when the UWP goes away.

However, the extension lifetime is in your control and for a different scenario you may choose to keep the extension process alive even after the UWP process goes away.

c. Lifetime of the AppServiceConnection

On every WM_HOTKEY message we open an AppServiceConnection to the UWP, which we will then close once it has been processed. We could also choose to keep the connection around for the lifetime of the process, but this would have the unwanted effect that the UWP would never suspend when minimized and therefore use more system resources than it should.


Credits

C# Code for the headless window to handle WM_HOTKEY inspired my this Stackoverflow answer: https://stackoverflow.com/questions/17133656/global-hotkeys-in-windowless-net-app/17136050

Tile icon for the Store sample provided by https://creativeninjas.com/ 

//BUILD 2018 Session Recording (plus other recent shows/podcasts)

Had a great time at //BUILD 2018 May 7-9, talking about MSIX for app packaging and deployment on Windows 10. Lots of great and helpful feedback received. Before you go watch the recording of my session, be sure to check out John Vintzel’s and Nona Sirakova’s overview session MSIX – Inside & Out as well – then view Dian Hartono’s and mine session for the additional details:

build2018
Click here to play video

Before BUILD I had the opportunity to be on the On .NET show to talk about what’s new for .NET Windows client app developers. We are covering the VS Packaging Project for WPF/Winform apps, as well as the Windows Template Studio for getting started quickly with UWP on Windows 10:

onnet
Click here to play video

Similar topics, with a bit more focus on the enterprise app developer we are covering with Jon Karlin in this video in the Windows 10 Developer Series:

changesToUWP2
Click here to play video

Also had the pleasure of being on the MS Dev Show podcast, hosted by Jason Young and Carl Schweitzer – we were chatting about Desktop Bridge and the VS Packaging Project:

msdevshow
Click here to play video.

(audio-only podcast is here)

UWP with Desktop Extension – Part 4

extensions4

If you haven’t read part 1 , part 2 and part 3 of this series yet, please start there first. In this final part I will explain how to submit a UWP with desktop extension to the Microsoft Store.

The .appxupload File

The Store accepts .appx, .appxbundle and .appxupload files (as well as .xap files for Silverligt phone apps). For UWP apps with desktop extension components the best way to go is the .appxupload file. The VS Packaging Project produces this file for you and ensures it includes all the right binaries, assets and symbols. It’s an important thing to remember to create the .appxupload off the packaging project, not the UWP project in your solution. The latter will not be valid for Store submission.

To produce the .appxupload file, right-click on the packaging project in Solution Explorer, and select “Create App Packages …”

screenshot1

Now follow the instructions in the wizard and select the appropriate options like version number, architecture etc.

screenshot2

Once you hit “Create”, VS will produce the .appxupload file as well as test packages that can be used for local testing. At this point it is recommended to perform the following test activities:

  1. Launch the Windows App Certification Kit (from the dialog) to run all the applicable certification tests. Any failures in the mandatory certification tests will block your Store submission, so you will want to get on top of those right away. Note that there are also optional tests in the suite. Those point to potential problems in the app that may lead to problems on certain devices/configurations. Those failures won’t block the submission, but are rather warnings for you to take a look and double-check. A typical optional failure we are seeing with desktop extensions is the 4.2 Blocked Executable test. This test warns you if it detects code that potentially launches unsigned EXEs or utilities such as PowerShell, cmd.exe or reg.exe, as those are not allowed in Windows 10 S mode. Note that these may be false positives and won’t block your Store submission.
  2. Perform a final test pass of the packaged app, outside of Visual Studio. What I typically do is copy the *_Test folder under AppPackages to a clean test machine or VM (i.e. one that doesn’t have a VS development environment) and run the Add-AppDevpackage powershell script to install it in a way that is nearly identical to how your customers will install it from the Store. Then sanity check all important features of your app, including your desktop extension.

screenshot3


Adding ARM Configuration

If you are targeting Mobile with your UWP, you will need to provide ARM packages. In the current build of Visual Studio 2017 (Update 15.7) the packaging project does not create ARM packages by default. You will have to edit the .wapproj and add ARM support explicitly:

screenshot4

Now replace “AnyCPU” with “ARM”, as you won’t need the neutral configuration for the packaging project:

<ProjectConfiguration Include="Debug|AnyCPUARM">
 <Configuration>Debug</Configuration>
 <Platform>AnyCPUARM</Platform>
</ProjectConfiguration>
<ProjectConfiguration Include="Release|AnyCPUARM">
 <Configuration>Release</Configuration>
 <Platform>AnyCPUARM</Platform>
</ProjectConfiguration>
...
<PropertyGroup Condition="'$(Configuration)|$(Platform)'=='Debug|AnyCPUARM'">
 <AppxBundle>Always</AppxBundle>
</PropertyGroup>
<PropertyGroup Condition="'$(Configuration)|$(Platform)'=='Release|AnyCPUARM'">
 <AppxBundle>Always</AppxBundle>
</PropertyGroup>

Once you have done those edits save the changes and reload the full solution (not just the project). Now you are set for building and submitting ARM packages (alongside your x86 and/or x64 packages).

It’s a good idea at this point to double-check the configuration properties in the solution for ARM. It should look like this:

screenshot5


Requesting ‘runFullTrust’ Approval

If you are submitting your UWP with desktop extension for the first time you will receive an error because you don’t have permission to submit apps with the ‘runFullTrust’ capability. To request access you are redirected to this form:
https://developer.microsoft.com/en-us/windows/projects/campaigns/desktop-bridge

Once you have submitted your info a Microsoft engineer will contact you and work with you through the onboarding process for your app. Once that is done you will be able to submit your app and any future updates just like for any other Windows Store application. We are working on making this initial onboarding process smoother and I appreciate your feedback. If you see any hiccups or delays going through the process please don’t hesitate to contact me and I will do my best to get you unblocked.

In Closing

This is it for my 4-part quick tutorial on how to make your UWP apps even better on PC by lighting up desktop extensions. What’s next? I have started to put together a number of concrete examples of activities that Windows Desktop apps typically need to perform outside of the sandbox, like integrating with legacy systems in LOB scenarios. Those I will blog about next and publish the samples in this repo – stay tuned for more on this coming soon …

https://github.com/StefanWickDev/ExtensionGallery